

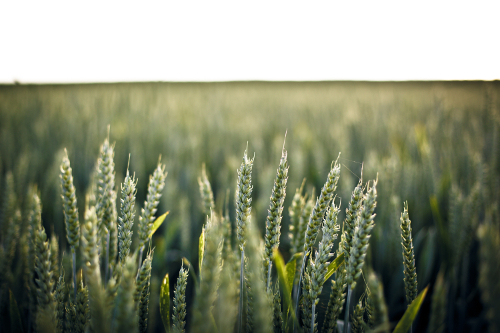
 Wheat is a gorgeous crop plant that can be just as decorative as it is edible. Green wheat can take the place of the taller grasses in landscaping that turns to a beautiful golden hue before harvest (timing. of which, depends on the species).
There are many varieties of wheats, so you can choose the right one for your tastebuds and climate. A handful of seeds, an average healthy soil, and you’re off. At the end of the season you can use it for harvest decorations, then toss into the compost bin to nourish next year’s soil. And, with the wheat yield’s possibly in decline, which raises the prices of wheat, a edible landscape isn’t a bad bargain.
But, the best thing is that they are really, really much easier and cheaper to harvest and use than you’d think. This article will show you how you can do all this with the humble wheat.
Decorative uses
It’s no secret that in an urban environment things have to be pretty. Wheat though? Seriously?
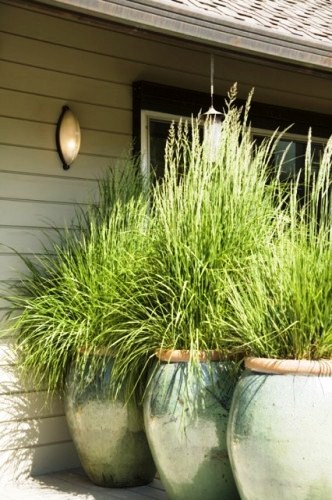
Yes, wheat. Wheat is a grass, just like many of the other purely decorative grass species, but with a twist of deliciousness at the end of it’s yearly life. Many grasses are used in either very modern landscapes with an bare, austere look as tuffs are scattered here and there amidst a rock garden. The other side of the coin usually shows grasses with a more rustic, shabby chic appeal as a mound of grass graces the area around a mailbox or highlights the walkway of a yard.
Apartments are not to be left out, either! Grasses — and wheat — grow beautifully in a large pot.
Here are some ideas on how to use grasses, and thus wheat, in the landscape.
-

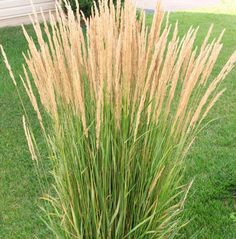
- Wheat won’t drop like ornamental grass, but you can put them in similar locations to create height.

-
- Line a path with graceful wheat.

-
- Use the height of wheat to surround a pool for privacy.

-
- Use large, decorative pots to hold the wheat and create a privacy stylish privacy fence.
-
- Create a “wall” to a room with tall wheat instead of ornamental grass.

-
- Random tuffs of wheat add interest to a otherwise flat yard.
Harvest and threshing
Now that you’re convinced that it will not bring the wrath of the home-owner’s associations, let’s clear up the misconception that wheat takes some heavy duty machinery to harvest, thresh, winnow, and grind for use. And, frankly, while examples from the old days made threshing and prepping wheat seem like a lot of hard labour and work, it can actually be a lot of fun for a small family.
Threshing
Threshing is the art of removing the wheat kernels from the stalk. It’s an art because you have to let the wheat dry out before you start the threshing. According to the Oregon State University Extension office, wheat needs to be no more than 16, 18, or 20% moisture at the time of harvest depending on the storage between the time of harvest (and threshing) and the use of the berries in their final destination.
 If you are going to use them right a way, a 20% moisture should be OK. However, if you have a preference for storing your berries for a while, the drier the better. The more moisture you have in them at the time of harvest will mean that mould may become more of an issue during storage than if they were dry. A good rule of thumb is to harvest the wheat stalks when the stalk ends are more brittle. The berries should be easier to remove at this stage, but not so brittle that the stalk itself breaks apart making more of a mess.
Savvy Tip: Don’t want to wait for harvest? Toss threshed and winnowed berries in a dehydrator for a couple hours to remove more moisture before storing in an air-tight jar.
After harvesting comes the stress-reducing part — you get to bash the stalks around to remove the berries. In the old days and in current times where they harvest large amounts of wheat by hand, they bundle up the wheat stalks and beat them on the ground. Or, they placed them on the ground and stomped on them for a while. However, Michelle and Gal over at the One Acre Farm have a cleaner way of doing it. They put the wheat stalks in a pillow case, then beat it with a stick or on the ground to knock the berries loose.
Whatever method you use to remove the berries from the stalk, you’ll end up with less stress, but a lot of mess. You’ll not only have the berries, but bits of the stalk, hulls, and chaff. You’ll need to remove the chaff and other bits of trash with a process called winnowing. Personally, I like the One Acre Farm method of just shaking a bucket with the whole lot, then scooping the lighter chaff off the top. Finally, pouring the seeds from one 5 gallon bucket to another and letting the wind blow away the leftover chaff makes the job really easy.
After that, you’re ready to use or story the berries for use.
Grinding and using
Most people in the western world have not eaten wheat that has not been ground up into flour. However, you can cook them as is with the following:
- ♦ Add water and wheat berries to a pot at a 3:1 ratio (water:wheat)
- ♦ Bring to a boil, and boil for 5 minutes.
- ♦ Lower to a simmer and cook for an hour, stirring occasionally. Add things at this time, if you wish.
- ♦ Eat warm or cold! They are great for muesli and more.
However, if you’re wanting to use the berries for a flour, you don’t need fancy equipment. Aimee, from Simple Bites, uses a KitchenAid with a mill attachment, while Tiffany from Don’t Waste the Crumbs uses a combination of a coffee grinder and blender to make hers. Clearly, there’s room for creativity when it comes to grinding wheat berries for your own uses.
If you want to buy a wheat grinder, Mel from Mel’s Kitchen put together a great guide to give you an overview of the different types out there in the world. You can find her post here: Wheat Grinding 101.
How will you use your wheat?
Got an idea for landscaping or favourite wheat recipes? Share with the community in the comments!